 Writing a Post - Text Formatting Buttons
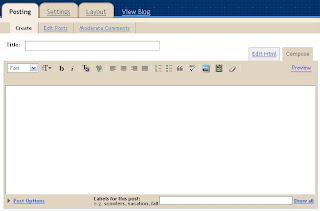
When you first set up your blog (and if you're using Blogger), you'll most likely choose your layout, and then get a button that says, "Start Posting". If you click that button, you are brought to a screen that looks much like the one to the right.
At the top of the screen are your tabs and navigation links, such as Layout, Settings, and Posting. (We are looking at the Posting screen for now.) Next down is the Moderate Comments, Edit Posts, and Create links. (We are in the Create screen for now.) On the top right, you should see your screen name, followed by links to your Dashboard, Help, and Sign out.
Buttons You May Already Recognize
Now move down into the white area, and the first line is your Title, with a text box to fill in. This is the title that search engines will look at - as well as real people who read your blog. So you want this information to convey the point of your post, but also let search engines determine "relevancy" in a particular set of search results. Your title should describe your post content (or what you will be writing about).
Next down, you have a row of buttons and tools that are similar to those you would find in most text programs, such as MS Word or Word Perfect. First is your Font selector. You can either choose the font prior to typing, or highlight text once you have written your post - and change the font. The "Font Size" is the next button, followed by "Bold", "Italic", and "Font Color".
 Adding Links
I stopped with "Font Color" because the button after that may confuse some people. The next button is your "Create Link" button. This button is what you would use to create a link within your post. To do this, you would highlight the word (or words) that you want linked, then click the "Create Link" button. A small pop-up screen will appear with a text box, and should ask you to enter a URL. This would be the site address of the page you want your visitors to go to if they click your new link. For example, if you click this link, you will be taken directly to my Blogging Writer site. (Click the "Back" button on your browser to return to this post.)
More Familiar Buttons
The next four buttons are your "Text Alignment" buttons, which will allow you to format your text to either be positioned to the left, in the center, to the right, or justified (such as the justified columns of a newspaper, which can have some strange effects on your text spacing).
The two buttons following the alignment buttons are for either a numbered list, or bulleted list. The quotations are for creating a specific "block" of text, usually added to a post as a quote from another source.

The next one is your "Spell Check" button. When you click it, if you have no misspelled words, you will see a message in green letters appear under your buttons row that says, "No misspellings found". If you have any misspelled words, you may already see them underlined in red throughout your post as you type. When you click the "Spell Check" button, misspelled words will appear highlighted in yellow. When you click on the yellow-highlighted words, a blue drop-down menu will appear with several word options to choose from. If one of them is the word you meant to type, click it to make the change. If none of them are the word you are looking for, you can either manually make the correction - or leave the spelling alone if you are sure you spelled it correctly. Spell checkers aren't always right, and they don't always pick up on grammatical errors.


1 comment:
Nice blog. Its easy to read and VERY in-depth. The screenshots are especially helpful. Keep up the good work!!
Brice
http://blogging-4beginners.blogspot.com
Post a Comment