Tuesday, May 6, 2008

Getting to Know Your Posting Tools in Blogger

Writing a Post - Text Formatting Buttons
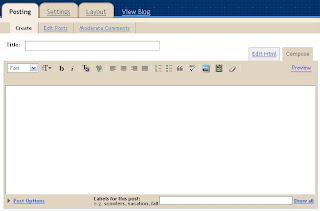
When you first set up your blog (and if you're using Blogger), you'll most likely choose your layout, and then get a button that says, "Start Posting". If you click that button, you are brought to a screen that looks much like the one to the right.

At the top of the screen are your tabs and navigation links, such as Layout, Settings, and Posting. (We are looking at the Posting screen for now.) Next down is the Moderate Comments, Edit Posts, and Create links. (We are in the Create screen for now.) On the top right, you should see your screen name, followed by links to your Dashboard, Help, and Sign out.

Buttons You May Already Recognize
Now move down into the white area, and the first line is your Title, with a text box to fill in. This is the title that search engines will look at - as well as real people who read your blog. So you want this information to convey the point of your post, but also let search engines determine "relevancy" in a particular set of search results. Your title should describe your post content (or what you will be writing about).

Next down, you have a row of buttons and tools that are similar to those you would find in most text programs, such as MS Word or Word Perfect. First is your Font selector. You can either choose the font prior to typing, or highlight text once you have written your post - and change the font. The "Font Size" is the next button, followed by "Bold", "Italic", and "Font Color".
Adding Links
I stopped with "Font Color" because the button after that may confuse some people. The next button is your "Create Link" button. This button is what you would use to create a link within your post. To do this, you would highlight the word (or words) that you want linked, then click the "Create Link" button. A small pop-up screen will appear with a text box, and should ask you to enter a URL. This would be the site address of the page you want your visitors to go to if they click your new link. For example, if you click this link, you will be taken directly to my Blogging Writer site. (Click the "Back" button on your browser to return to this post.)

More Familiar Buttons
The next four buttons are your "Text Alignment" buttons, which will allow you to format your text to either be positioned to the left, in the center, to the right, or justified (such as the justified columns of a newspaper, which can have some strange effects on your text spacing).

The two buttons following the alignment buttons are for either a numbered list, or bulleted list. The quotations are for creating a specific "block" of text, usually added to a post as a quote from another source.
The next one is your "Spell Check" button. When you click it, if you have no misspelled words, you will see a message in green letters appear under your buttons row that says, "No misspellings found". If you have any misspelled words, you may already see them underlined in red throughout your post as you type. When you click the "Spell Check" button, misspelled words will appear highlighted in yellow. When you click on the yellow-highlighted words, a blue drop-down menu will appear with several word options to choose from. If one of them is the word you meant to type, click it to make the change. If none of them are the word you are looking for, you can either manually make the correction - or leave the spelling alone if you are sure you spelled it correctly. Spell checkers aren't always right, and they don't always pick up on grammatical errors.

Thursday, May 1, 2008

Setting Up SiteMeter to Track Visitors

In a previous post, I mentioned using SiteMeter to track your visitors. Here are a few tips and tricks to using SiteMeter that will help you get the most use out of their free traffic tracking gadget.

The first thing you will want to do is click "HTML Code" from the left hand side of the screen, using the green navigational links. Copy and paste the tracking code from their website to an area you are able to edit your sidebars. (If you are using Blogger, this would be your "Add Page Elements" link from your "Dashboard". Once you have installed the code on your website or blog, you'll be ready to track your next visitor!

  • "Statistics" link on top of page - that's where you can see how many visitors have been on your site, and some information about how they found your site and stuff like that. You should see a list with black headings and green links.
  • "Manager" link on top of page - the green links on the left will provide different options on this page. One of those options is "Stats by Email" - click that link. From here, you choose how often you want your stats sent to your email. I chose every day because then I can view my stats in an email - and hardly ever have to visit the site to log in just to see your overall traffic stats.
  • From the same screen, click the link on the left side that says "Ignore Visits". This is where you can either have the counter "count" your visits to the site - or ignore your own visits to your site (and "count" all other visitors in your statistics).
  • From the same screen again, you can also use the left green links to change your password to something you can remember easily, and a few other useful things.
Poke around in the SiteMeter website, and see what other tools could be useful for you. You can use the reports to see what region your readers are visiting your site from, and their browser details as well. Pages they have clicked, total time they spent on your site, and where they came into your site, as well as what page they were on when they decided to leave. Best of all, it's a free program, worth every penny - and more!

Tracking Your Visitors Once You Start Blogging

Most new bloggers want to know one things - how many visitors they have have today. This is not unusual, and you can easily track this information and more. While there are a lot of different ways to track visitors on your blog or website, some of them are better than others. Some of the best have one thing in common - they are free.

You can actually accomplish one other important step by taking the following route, which will not only get you started in tracking visitors, but also push your blog closer to the top of search engine results pages.
  • Start off by going to SiteMeter and signing up for an account. SiteMeter is an extremely useful tool for tracking the number of visitors that come to your site. You can also view the entry pages (which page they "landed" on when they first got to your site), exit pages (which page they were on when they left your site), and many more details about your visitors. You can even predict the growth of your traffic based on previous daily, weekly, and monthly stats.
  • Visit Ping-O-Matic for an easy route to both of the above goals.
  • You'll see a list of sites to "ping" (which basically tells the site that you have updated your blog recently, and to check for changes.). Among the listed choices are IceRocket, Technorati. Sign up for both of these websites - both of them will show you information about your visitors, and who's linking to your site.
  • AFTER you have signed up for as many of the sites on Ping-O-Matic that apply to your blog, and submitted your blog - head back to the Ping-O-Matic website. Enter your blog information (don't worry if you don't yet have an RSS or Atom feed, you can leave that blank). Then check mark all of the boxes next to the sites you submitted to earlier, scroll down, and press "Send Pings". Repeat the ping each time you update your site, or set a time each week or month to do this. It is an important part of letting the search engines know that you keep your site up to date, and where readers can find you!
Don't neglect to keep writing fresh content on your blog - it can be really distracting on the web at times, and you don't want to forget your overall goals!